 Save
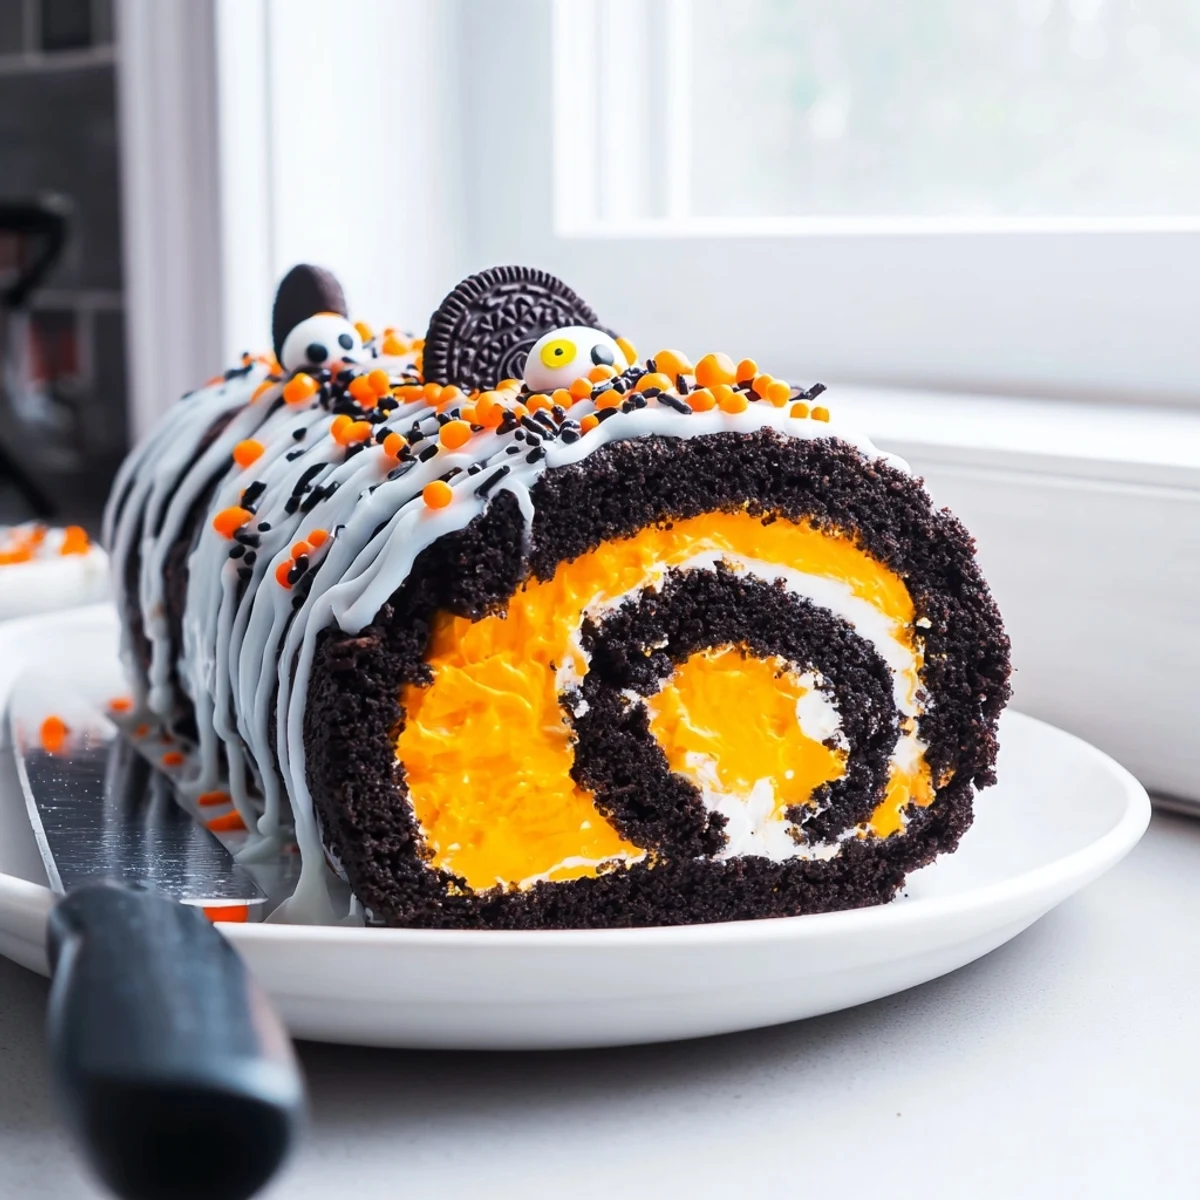
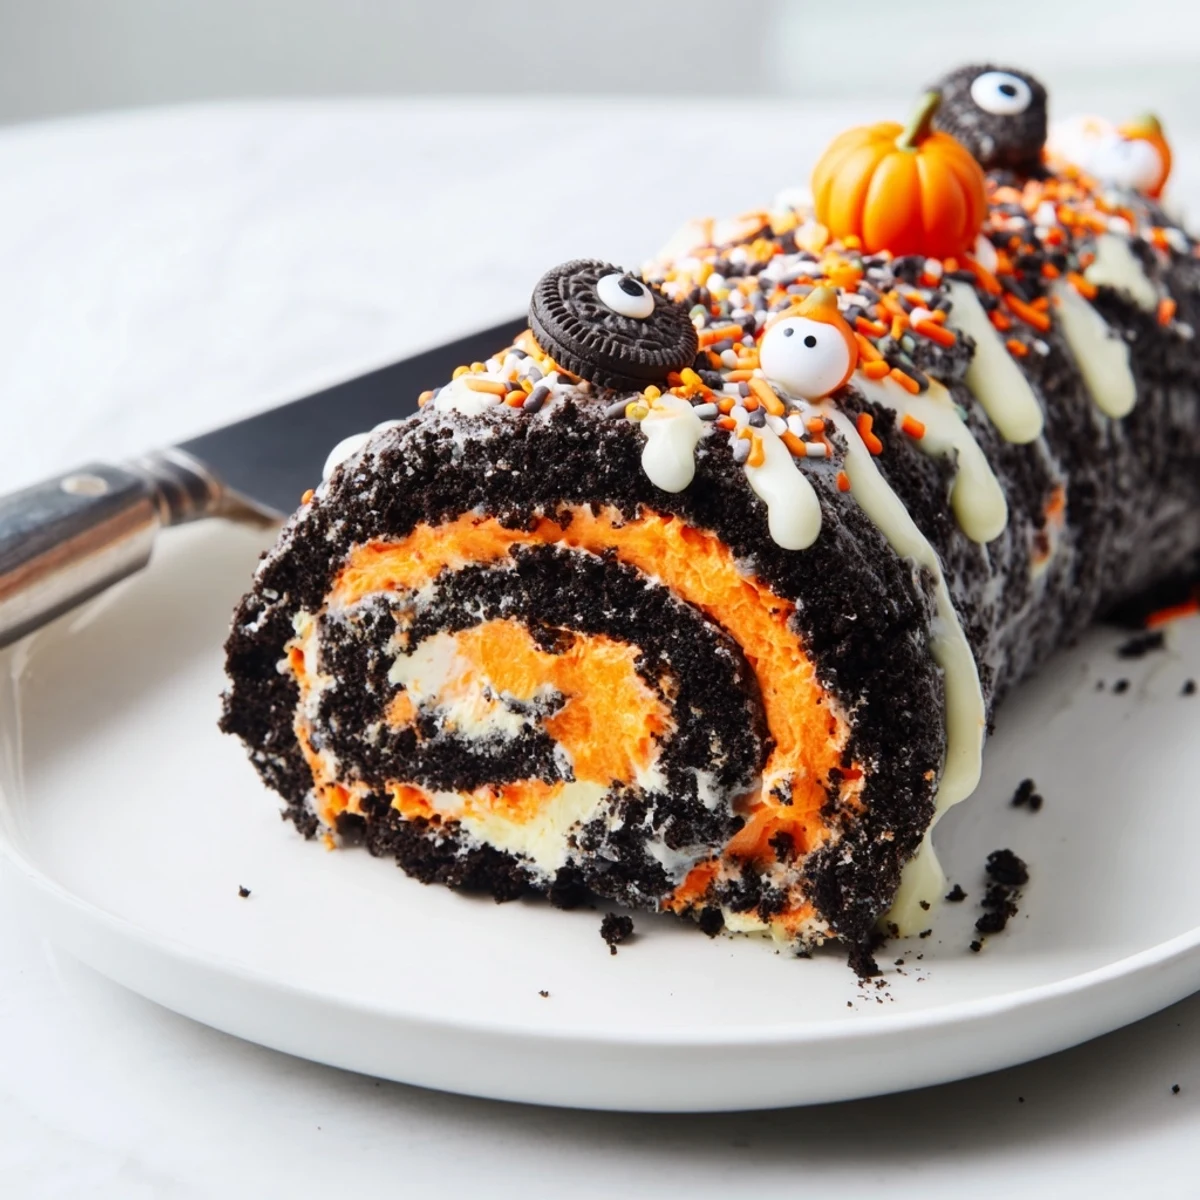
Save This totally epic Halloween Oreo roll combines crushed sandwich cookies with a creamy, colorful whipped filling for an impressive no-bake dessert. The chocolatey Oreo base gets rolled with orange or purple tinted cream, creating a stunning swirled log that's perfect for Halloween gatherings.
Ready in just 25 minutes plus chilling time, this festive treat requires zero baking—simply crush, mix, roll, and chill. The result is a rich, indulgent slice that's both visually striking and irresistibly delicious. Customize with Halloween sprinkles, candy eyes, and chocolate drizzle for maximum spooky effect.
Each bite delivers the perfect balance of crunchy chocolate cookie and silky smooth cream. Great for making ahead and storing in the refrigerator for up to three days.
The kitchen was already covered in orange sugar sprinkles when my youngest announced she wanted something spookier than cupcakes for her class party. I grabbed the Halloween Oreos from the pantry and decided to wing it, crushing them straight into a bowl with whatever cream cheese I had left. That accidental experiment turned into the most requested treat at every gathering since.
Last year I made three of these rolls for different Halloween events because they disappear so quickly. My neighbor now texts me in September asking if I'm making them again, and I've caught people sneaking seconds before the party even officially starts.
Ingredients
- 36 Halloween Oreos: The seasonal ones with orange cream give you that instant Halloween color, but regular Oreos work perfectly fine too
- 1 cup powdered sugar: This sweetens the cookie base and helps bind everything together into that perfect dough-like texture
- 6 tbsp unsalted butter, melted: Make sure it's completely cooled slightly before mixing so it doesn't melt the cream cheese too quickly
- 4 oz cream cheese, softened: Leave this out for at least an hour so it blends seamlessly without any lumps
- 1 cup heavy whipping cream: Cold cream whips up faster and holds those stiff peaks better, so don't skip the chilling time
- 1/4 cup powdered sugar: This sweetens the whipped cream just enough to balance the rich cookie base
- 1 tsp vanilla extract: Pure vanilla makes such a difference here compared to imitation
- Orange or purple food coloring: Gel coloring works best and won't thin out your whipped cream like liquid food dye can
- Halloween-themed sprinkles: The more sprinkles the better, I always say
- Candy eyes: These turn your roll into a cute mummy or monster face
- Melted white or dark chocolate: A quick drizzle makes this look professionally finished
Instructions
- Prepare your workspace:
- Line a large baking sheet or your counter with parchment paper, making sure it's large enough to hold a rolled log
- Make the cookie base:
- Pulse the Oreos in your food processor until they're fine crumbs, then mix with powdered sugar, melted butter, and softened cream cheese until everything comes together in a thick dough
- Roll it out:
- Place the dough between two sheets of parchment and roll to about 1/2 inch thick, keeping it as rectangular as possible
- Whip the cream:
- Beat your cold heavy cream with powdered sugar and vanilla until stiff peaks form, then gently fold in your food coloring until evenly colored
- Spread and roll:
- Spread the colored cream over your cookie base leaving a 1 inch border, then use the parchment to help you roll it into a tight log starting from the long edge
- Chill thoroughly:
- Refrigerate for at least one hour until firm enough to slice cleanly
- Decorate and serve:
- Drizzle with melted chocolate, add sprinkles and candy eyes, then slice into 1 inch pieces with a sharp knife
 Save
Save My daughter now asks to help make this every year, and it's become our Halloween Eve tradition while watching scary movies. The best part is seeing how proud she looks serving something she helped create to our friends and family.
Making It Your Own
I've started experimenting with different color combinations and sometimes add a pinch of orange zest to the whipped cream for brightness. You could also use crushed candy canes in December and make this a holiday tradition year-round.
Storage Solutions
This actually tastes better the next day when all the flavors have had time to meld together. Store it wrapped tightly in the refrigerator and it stays fresh for three days, though I've never had it last that long in my house.
Serving Suggestions
Slice these just before serving so the whipped cream doesn't lose its shape. A quick chill in the freezer for 15 minutes before cutting helps you get those perfect clean slices.
- Warm your knife under hot water and dry it between slices for the cleanest cuts
- Arrange on a platter with extra candy eyes around the edges for maximum spooky effect
- These pair perfectly with a cup of hot apple cider or pumpkin spice latte
 Save
Save There's something magical about cutting into that first slice and seeing the perfect spiral of orange cream against the dark cookie. Happy haunting and happy baking.
Recipe FAQs
- → How long does the Oreo roll need to chill?
-
The roll requires at least 1 hour of refrigeration time to firm up properly before slicing. This allows the filling to set and makes clean, neat slices possible.
- → Can I make this gluten-free?
-
Yes! Simply substitute the Oreos with gluten-free sandwich cookies. Ensure all other ingredients, including sprinkles and decorations, are certified gluten-free as well.
- → How far in advance can I prepare this?
-
You can make the Oreo roll up to 3 days in advance. Store it well-covered in the refrigerator. Add decorations like sprinkles and chocolate drizzle shortly before serving for the freshest appearance.
- → What's the best way to get clean slices?
-
Use a sharp knife and wipe the blade clean between each slice. For even cleaner cuts, you can briefly run the knife under hot water and dry it before slicing through the chilled roll.
- → Can I use regular Oreos instead of Halloween ones?
-
Absolutely! Regular Oreos work perfectly. You can add orange food coloring to the cream filling to achieve the Halloween theme. The taste will be identical.
- → How many servings does this yield?
-
This roll produces 12 generous one-inch slices. It's perfect for a medium-sized Halloween party or gathering. You can easily slice thinner pieces to stretch it to 16 servings if needed.
