 Save
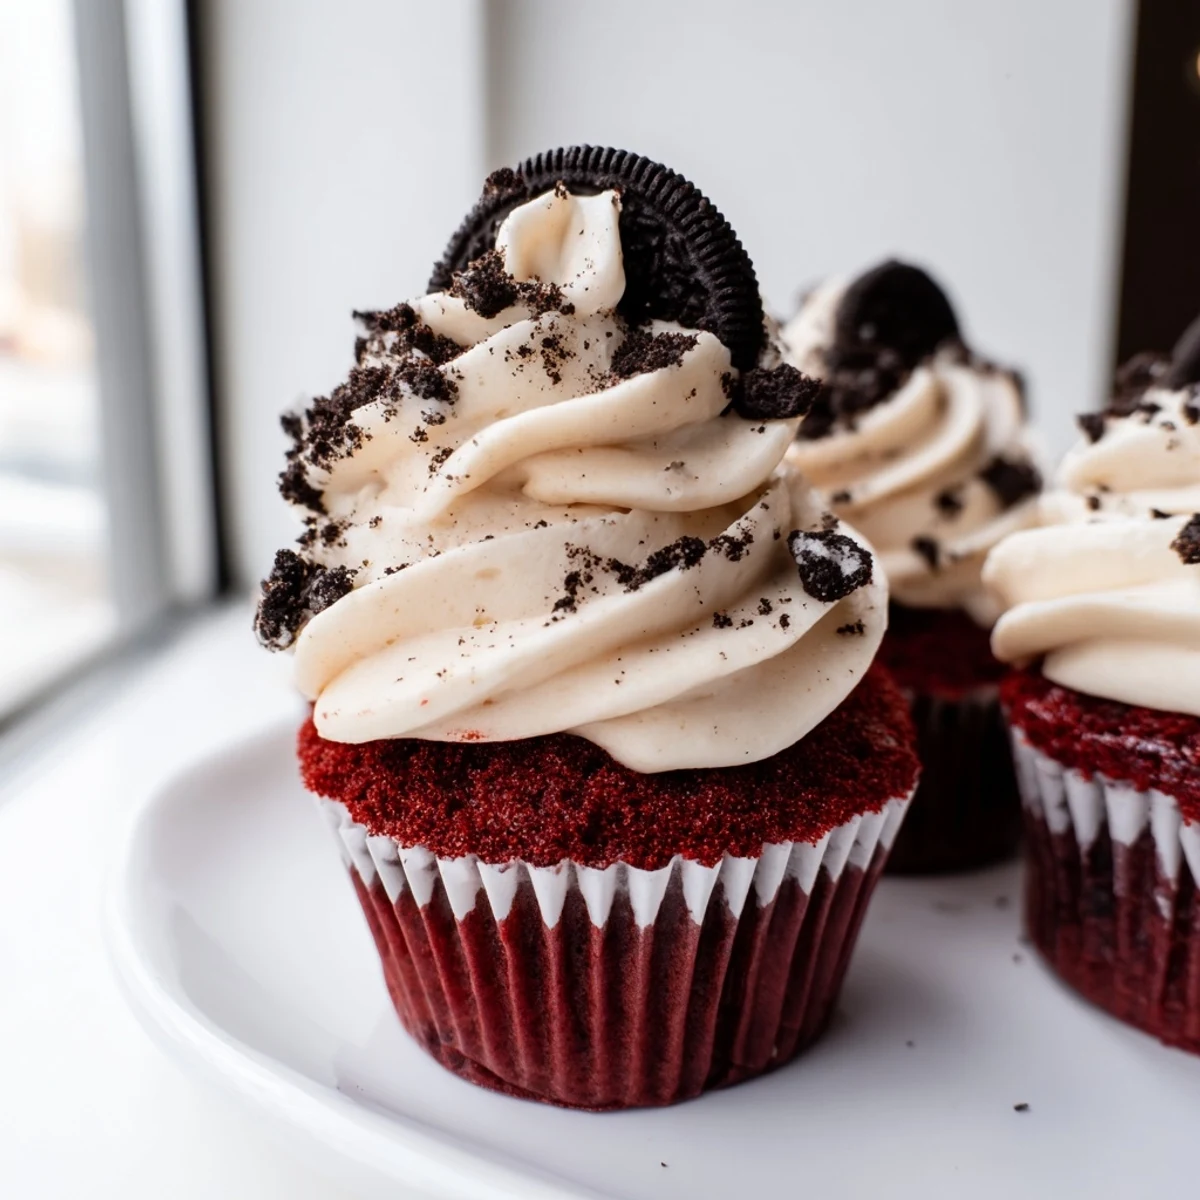
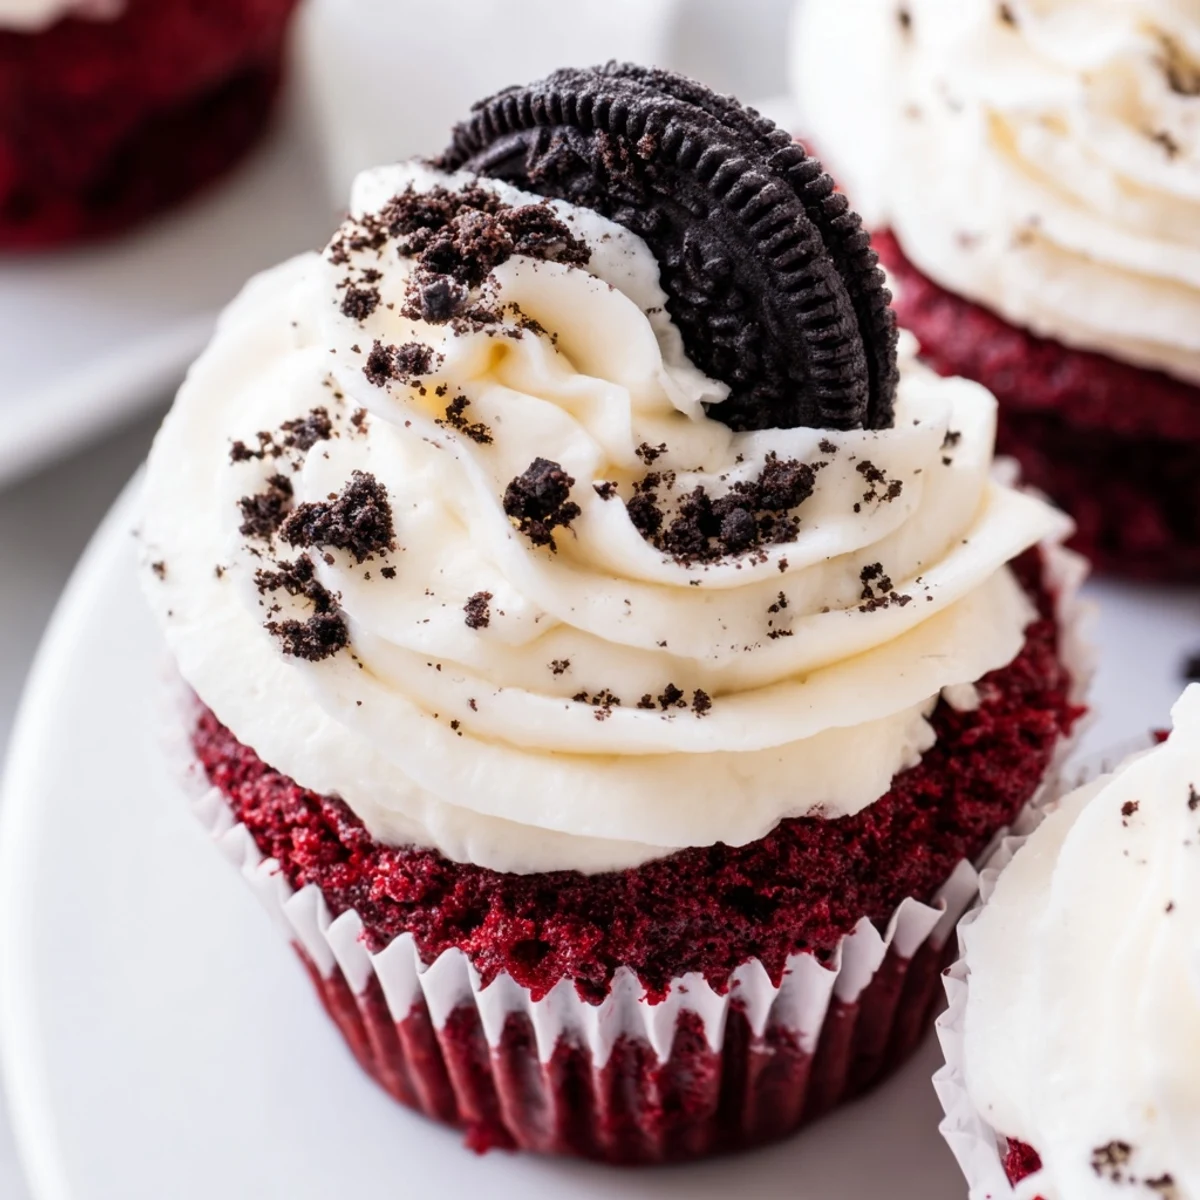
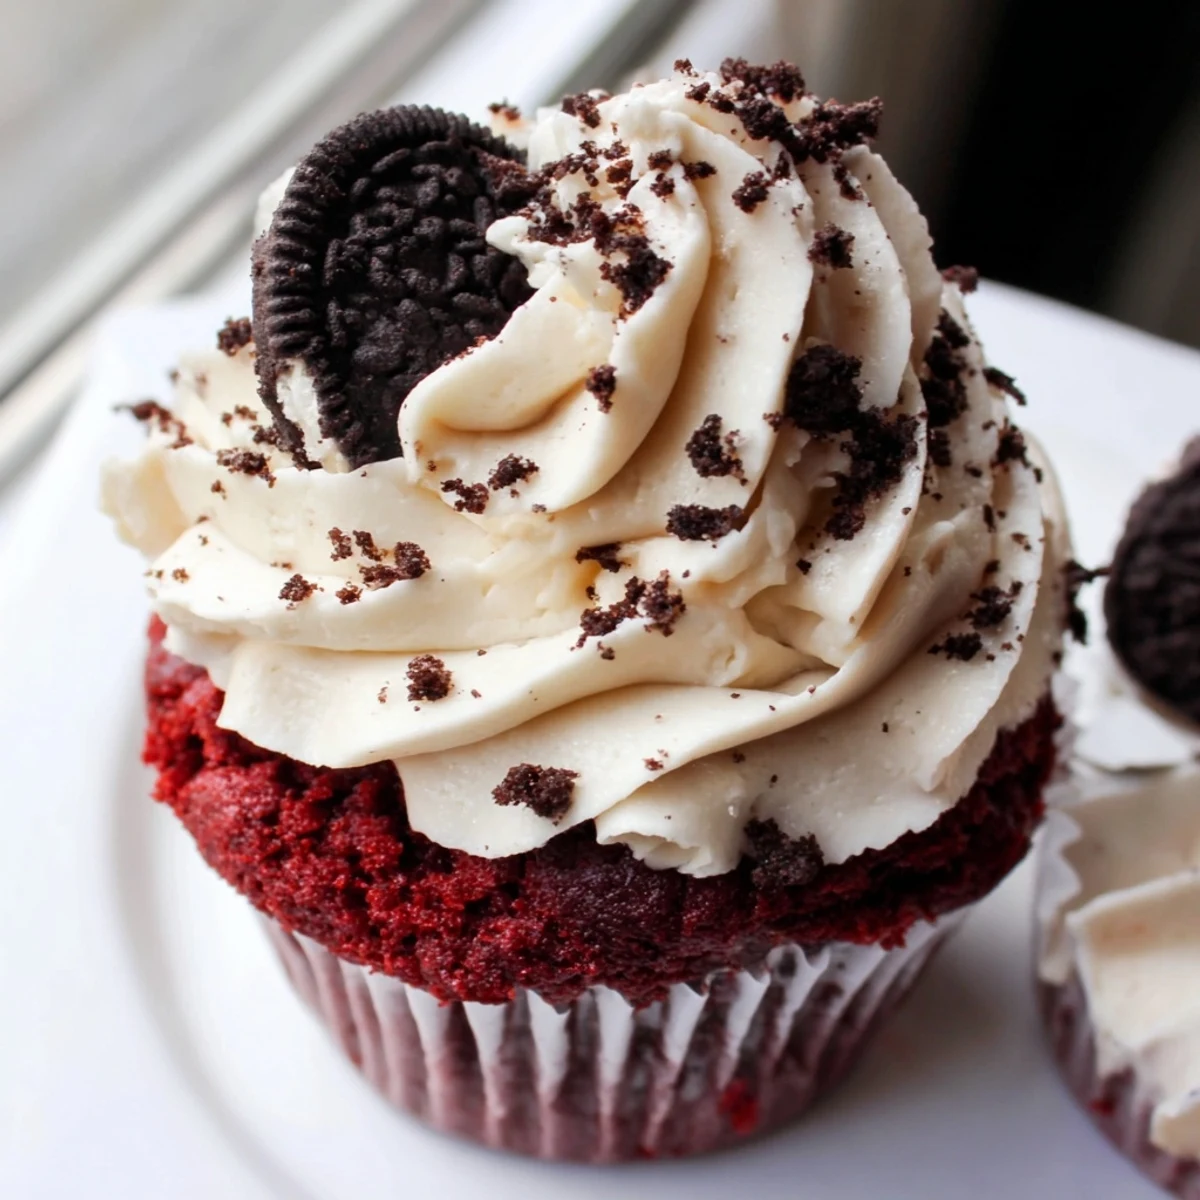
Save These indulgent cupcakes bring together two beloved desserts in one. A whole Oreo cookie sits at the bottom of each liner, creating a crunchy surprise beneath a soft, cocoa-kissed red velvet sponge.
The crowning glory is a luscious cream cheese frosting loaded with crushed Oreo pieces, piped generously on top. Garnished with extra cookie crumbs or mini Oreos, these treats are as stunning to look at as they are to eat.
Ready in just 40 minutes, they yield a dozen beautifully rich cupcakes that are perfect for celebrations, bake sales, or simply satisfying a sweet craving.
My kitchen looked like a crime scene the first time I made red velvet anything, red smears across the counter, my apron, even the cat who got too close. But those stains were worth it when I pulled a tray of crimson crowned cupcakes from the oven, each hiding a whole Oreo at the bottom like a buried treasure. Now they are the one dessert people specifically request when I offer to bring something. There is something undeniably joyful about a cupcake that commits so fully to being a spectacle.
I brought a batch of these to a friends potluck dinner and watched a quiet room turn into a chorus of wait what is at the bottom. Within ten minutes, three people had pulled me aside to ask for the recipe, and one person was honestly just eating the frosting off the top with a spoon. That reaction told me everything I needed to know about whether this one was a keeper.
Ingredients
- 1 cup (125 g) all-purpose flour: The structural backbone of the cupcake, measured properly by spooning into the cup and leveling off so you do not end up with dense little bricks.
- 2 tbsp (15 g) unsweetened cocoa powder: Just enough to give red velvet its signature subtle chocolate undertone without turning these into full chocolate cupcakes.
- 1/2 tsp baking soda: Works with the acidity of the buttermilk to give the cupcakes a gentle lift and a tender crumb.
- 1/4 tsp salt: A small amount that sharpens every flavor and keeps the sweetness from becoming cloying.
- 1/2 cup (115 g) unsalted butter, softened: softened means you press it gently and leave a small indent, not melted into a puddle, which would change the entire texture.
- 1 cup (200 g) granulated sugar: Creamed with the butter to create tiny air pockets that help the cupcakes rise beautifully.
- 2 large eggs, room temperature: Room temperature eggs incorporate more smoothly into the batter and prevent any curdling when they meet the buttermilk.
- 1/2 cup (120 ml) buttermilk, room temperature: The secret to a moist, tender crumb, and its tang balances the sweetness perfectly.
- 1 tsp vanilla extract: Rounds out the cocoa and enhances the overall warmth of the flavor profile.
- 1 tbsp red food coloring (liquid or gel): Gel gives a more vivid, dramatic red with less liquid, but either works if that is what you have on hand.
- 12 Oreo cookies, whole: These sit at the bottom of each liner and soften into a fudgy, cookie infused base as the cupcake bakes around them.
- 8 oz (225 g) cream cheese, softened: The soul of the frosting, make sure it is truly soft or you will spend forever chasing lumps.
- 1/2 cup (115 g) unsalted butter, softened: Combined with cream cheese for a frosting that is rich but not heavy, with a silky spreadable consistency.
- 2 cups (240 g) powdered sugar, sifted: Sifting is nonnegotiable here unless you enjoy the feeling of grainy sugar lumps under your piping tip.
- 1 tsp vanilla extract: Adds aromatic warmth to the frosting and bridges the tang of the cream cheese with the sweetness of the sugar.
- 4 crushed Oreo cookies: Folded into the frosting for little pockets of crunch that contrast the cloudlike texture.
Instructions
- Preheat and prepare the pan:
- Set your oven to 350 degrees F (175 degrees C) and line a 12 cup muffin tin with paper liners. Take a moment to admire the blank canvas before the beautiful chaos begins.
- Plant the Oreo surprise:
- Drop one whole Oreo cookie into the bottom of each liner, flat side down. Press gently so it sits level and waits patiently for the batter to come.
- Whisk the dry ingredients:
- In a medium bowl, combine the flour, cocoa powder, baking soda, and salt with a whisk until evenly distributed. The cocoa tends to clump so be thorough about it.
- Cream butter and sugar:
- In a large bowl, beat the softened butter and sugar together with an electric mixer on medium speed until the mixture turns pale, light, and noticeably fluffier. This usually takes about three minutes and patience here pays off in texture.
- Add eggs and color:
- Add the eggs one at a time, mixing well after each addition until fully incorporated. Pour in the buttermilk, vanilla extract, and red food coloring, then mix until the batter turns a gorgeous uniform crimson.
- Combine wet and dry:
- Gradually add the dry ingredient mixture to the wet ingredients, mixing on low speed until just combined and you see no more dry streaks. Stop mixing the moment everything comes together because overmixing is the enemy of tender cupcakes.
- Fill the liners and bake:
- Divide the batter evenly among the 12 liners, filling each about three quarters full so they have room to dome beautifully. Bake for 18 to 20 minutes, testing with a toothpick inserted into the cake part, not the Oreo, and it should come out clean.
- Cool completely:
- Let the cupcakes rest in the tin for five minutes, then transfer them to a wire rack to cool entirely. Frosting a warm cupcake is a guaranteed path to a melted mess.
- Make the frosting:
- Beat the softened cream cheese and butter together until perfectly smooth and lump free. Add the sifted powdered sugar and vanilla, then whip on medium high speed until the frosting is fluffy and spreadable, about two minutes.
- Finish with crushed Oreos and decorate:
- Gently fold the crushed Oreo pieces into the frosting with a spatula, being careful not to overmix and turn the whole thing grey. Pipe or spread generously onto each cooled cupcake and garnish with extra crumbs or mini Oreos if you are feeling fancy.
 Save
Save One rainy Saturday I left a plate of these on the kitchen counter while I answered the door, and when I came back my partner had eaten three without any trace of guilt on his face. He looked at me, frosting still on his thumb, and said very calmly that these were dangerous and we should not keep them in the house. I took it as the highest compliment I have ever received.
A Note on That Red Color
The color of red velvet is half the fun, and getting it right is more art than science. I have tried using less food coloring and ended up with a sad brownish pink that disappointed everyone at first glance before they even tasted it. A full tablespoon of liquid coloring or about a teaspoon of gel gives you that show stopping deep red that makes people reach for one before you have even set the plate down.
Choosing the Right Oreos
Classic Oreos work perfectly here because their cream filling melts into the cupcake base during baking, creating an almost gooey layer at the bottom. I once tried double stuffed Oreos thinking more cream would be better, but the extra filling made the base slightly too soft and the cupcake did not hold its shape as well. Stick with the original and you will not go wrong.
Storing and Serving
Because the frosting contains cream cheese, these are not cupcakes you can leave sitting out on a warm counter all afternoon. Store them in the refrigerator in an airtight container and pull them out about fifteen minutes before serving so they can soften slightly. Cold frosting dulls the flavor, and these deserve to be tasted at their best.
- If you are transporting them, keep the cupcakes chilled in the container until you arrive so the frosting does not slide off during the trip.
- A quick dusting of Oreo crumbs on top right before serving gives a fresher crunch than adding them ahead of time.
- These are best enjoyed within two days, when the cake is still moist and the Oreo base still has a slight chew to it.
 Save
Save Every time I make these, someone asks me what my secret is, and honestly it is just an Oreo at the bottom of a cupcake and the willingness to get a little red food coloring on my hands. Sometimes the best recipes are the ones that make people happy before they even take a bite.
Recipe FAQs
- → Can I make these cupcakes without food coloring?
-
Yes, you can omit the red food coloring entirely. The cupcakes will have a subtle brown cocoa color instead of the classic red hue. The flavor remains the same, though the visual impact changes. If you prefer a natural alternative, try beetroot powder for a reddish tint.
- → Why do my cupcakes sink in the middle?
-
Sinking usually happens when the oven door is opened too early during baking or when the batter is overmixed. Avoid opening the oven before the 15-minute mark. Mix the batter until just combined after adding the dry ingredients to prevent excess air pockets from collapsing.
- → How should I store leftover cupcakes?
-
Store them in an airtight container in the refrigerator for up to three days because of the cream cheese frosting. Let them sit at room temperature for about 20 minutes before serving to soften the frosting and bring out the best flavor and texture.
- → Can I freeze these cupcakes?
-
You can freeze the unfrosted cupcakes for up to two months by wrapping them tightly in plastic wrap and placing them in a freezer bag. Thaw overnight in the refrigerator, then frost them fresh. Once frosted, they do not freeze well due to the cream cheese topping.
- → What can I substitute for buttermilk?
-
Add one tablespoon of white vinegar or lemon juice to a half cup of regular milk and let it sit for five minutes until it curdles slightly. This homemade buttermilk substitute works perfectly in the batter and keeps the cupcakes tender and moist.
- → Can I use a different cookie instead of Oreos?
-
Absolutely. Any sandwich-style cookie or crisp chocolate cookie works well at the base and in the frosting. Try golden sandwich cookies, chocolate chip cookies, or even graham crackers for a different flavor profile while maintaining that satisfying crunch.
